I decided that I wanted to get some writing down on a walkthrough of how an intermediate amateur goes from idea to execution to delivery on a PCB design. This is the kind of thing that I wanted to read when I was getting started in this hobby.
Requirements
First off - what am I trying to do?
I’m doing a major house renovation. A goal of this renovation is going to be that I bring as much of the outside ‘inside’ without compromising insulation. This has meant, for example, super-insulated windows that allow for lots of light to be let in, as well as some plumbed irrigation to get a lot of green inside.
A consequence of new construction is that temperature insulation creates sound insulation - and I want to still be able to hear the rain on the roof.
So - what I’d like to do is put a little microphone outside that could send an audio stream to the in-ceiling speakers in the main living room / kitchen area.
I have Cat6 ethernet run to outside from a switch in the basement. This solves both the power and the connectivity challenge in one cable, and much more neatly than a combination of WiFI (could be unreliable) and either low voltage run through the wall, or line voltage + a DC adapter outside the wall (gross). So - I’d like Power over Ethernet to be the solution.
This device will have no ‘analog out’ - I want to have it send a stream of audio (e.g. PCM), that could then be received by something more capable and with a direct connection to the sound system in the house.
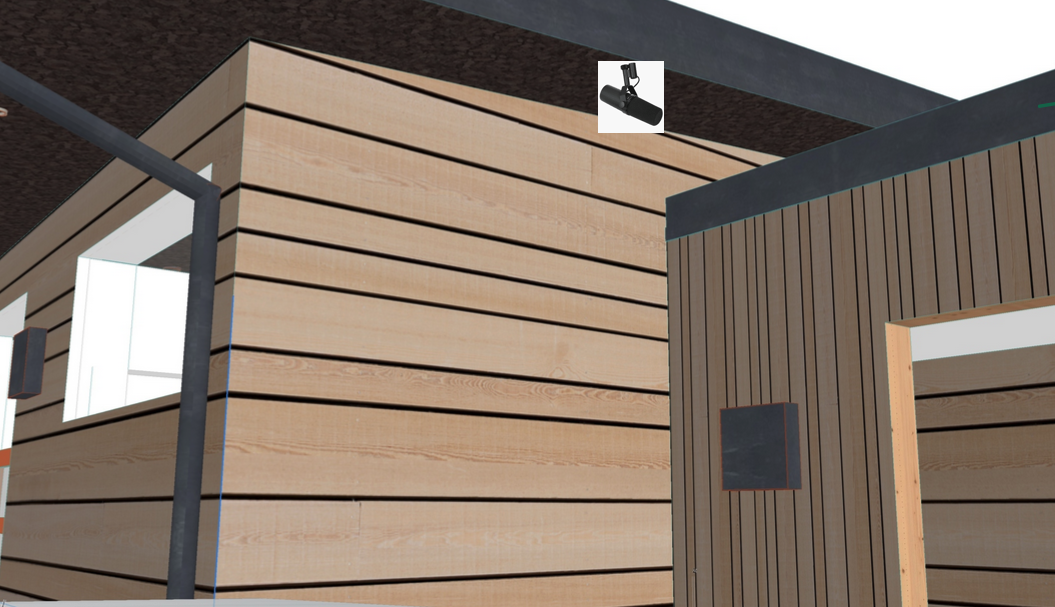
I’d also like to keep the size minimal - this will be mounted underhanging under a soffit (logically ‘pointed at’ a different, lower section of roof, as shown below), so should be generally rain-protected, but the smaller the better for both ease of mounting and ease of waterproofing.
Alternatives
To state the obvious - I’m completely contriving a way to make this more complicated than it technically needs to be, because this is for fun, and for learning. If I wanted to do this in the easiest possible way, I’d put something like a Raspberry Pi or BeagleBone outside and hook up a USB microphone to it. But - I wouldn’t learn anything doing that. That would also create some additional complexity elsewhere, and not the fun kind of complexity where I’m learning, but the un-fun kind of complexity where I could probably do it but I’d hate every second of it:
- I’d have to deal with Linux.
- Not just Linux, but sound in Linux.
- I’d be dealing with a larger, more fiddly device comprised of a raspberry pi with probably a cable running from its USB port to a microphone, and then with something like a PoE hat.
High-level Components
One of the big challenges that I had early on getting into electronics design was being really overwhelmed with choice. A supplier like DigiKey or Mouser is usually what you’re going to end up using to order your parts from, but how do you even begin?
Here’s what we know that we’ll need:
- A microcontroller. I’d like to not deal with Linux here, and modern MCUs both are fast and have great connectivity options, including Ethernet. This microcontroller is going to need a built-in Ethernet MAC and an I2S interface for audio.
- A microphone. For something like this that I’d like to keep small and simple - a MEMS digital microphone will surface-mount to a PCB, is just a few millimeters across, and can supply an already-digitized audio stream to the MCU over I2S.
- An Ethernet PHY. The MCU will have the MAC - but a MAC must connect to a distinct IC that interfaces to the actual RJ45 jack.
- A PoE controller. This is an IC that also connects to lines coming from the RJ45 jack, and manages the sequence of events that cause the upstream PoE switch to actually send power to the port.
There will be surrounding circuitry, debug and programming pins, power-related pieces, etc here but those are the big 4 for this design.
Component Selection - MCU
As stated above - we need something that has I2S and an Ethernet MAC. Additionally - I’d like it to be from a relatively major vendor where I have some experience and confidence in the development toolchain.
For me, that requirement takes me to either Microchip or ST Microelectronics. Both have large product catalogs of microcontrollers - so worth starting there.
Microchip has a super-handy PDF brochure - the older version had a better table in it though, which I’ll reproduce here:
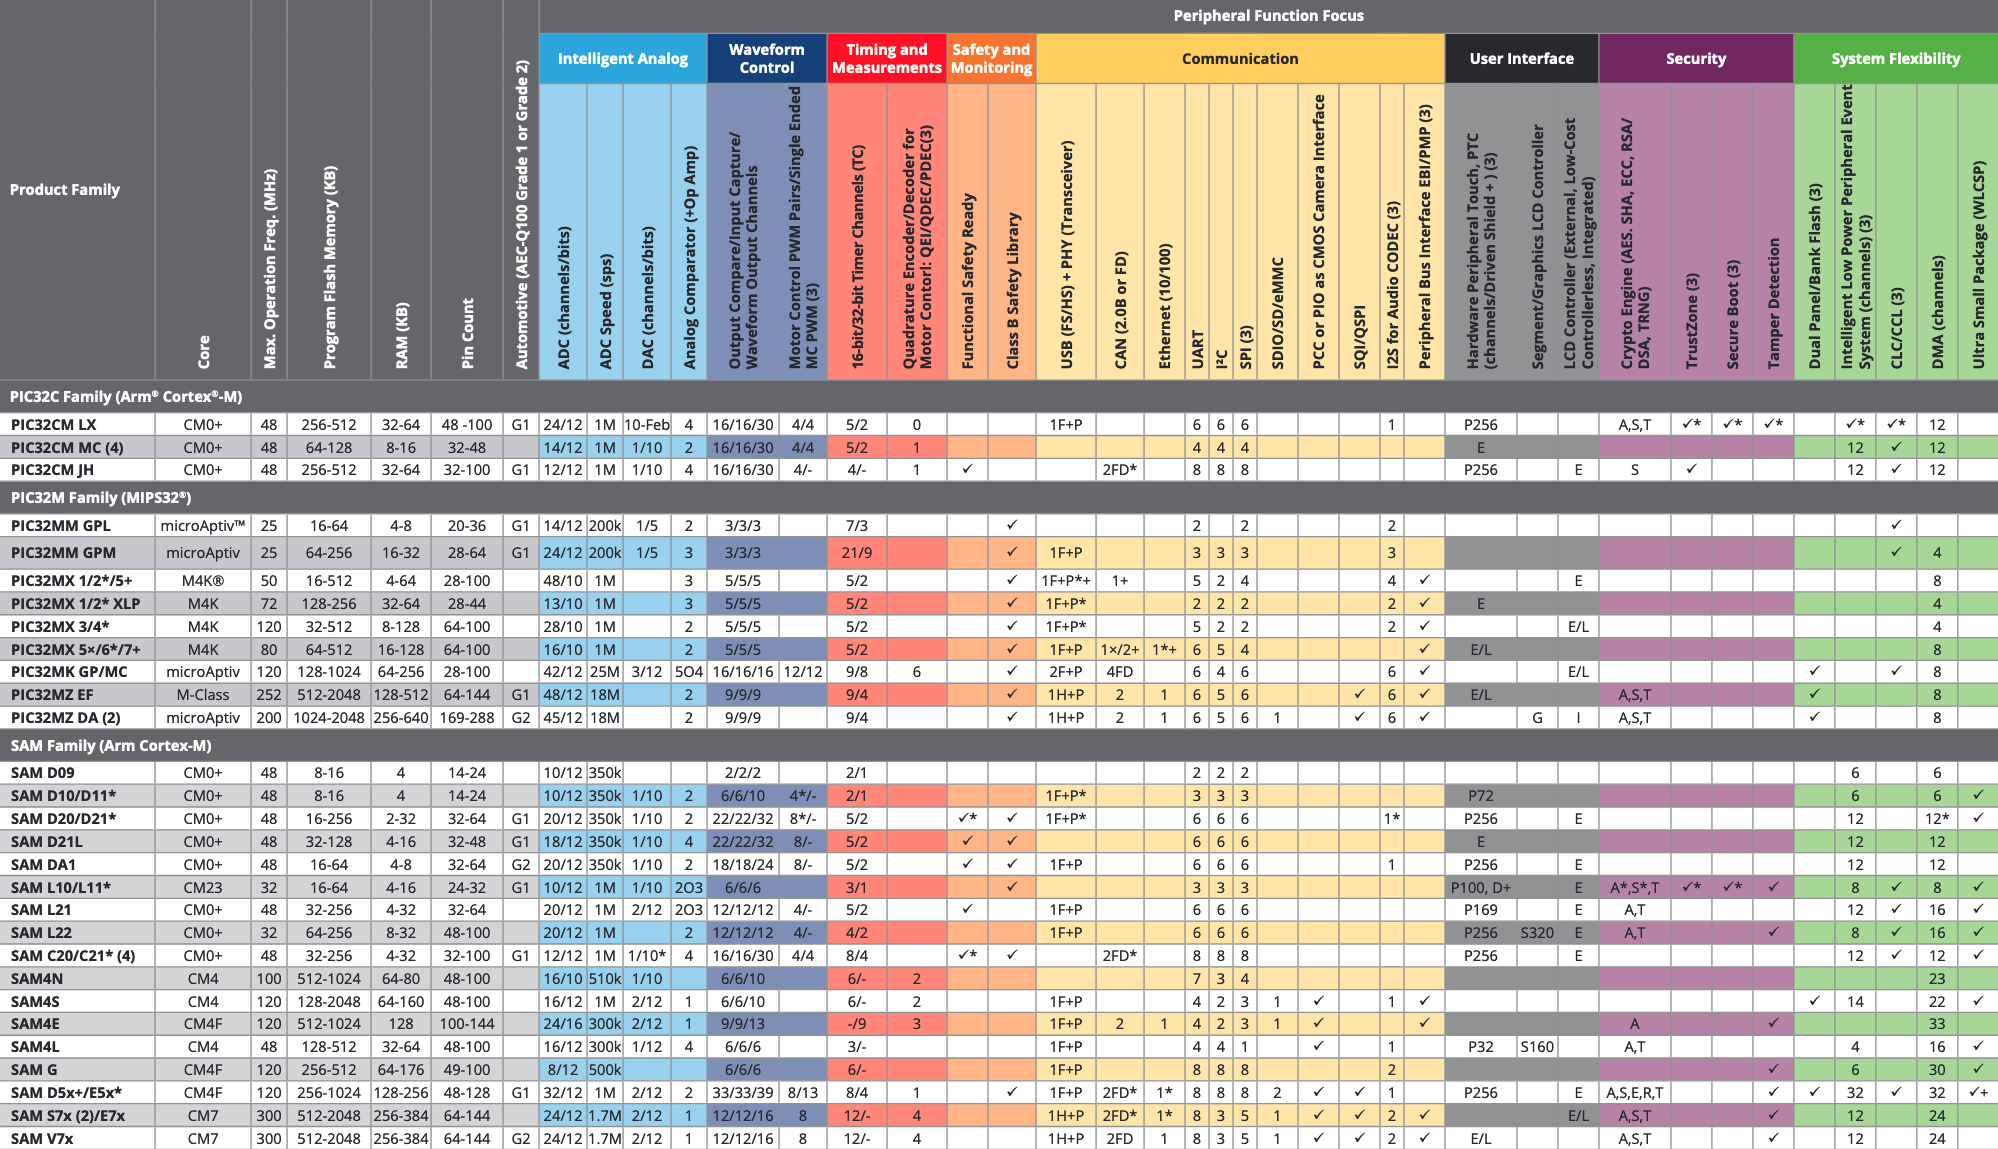
Just from a familiarity perspective, and for the best odds at a usable toolchain, I’m going to look only at ARM parts, which with the I2S and Ethernet connectivity requirements narrows the field to the SAM E5x, E7x, or V7x. I have a suspicion that the ‘*7x’ parts might be overkill - I don’t need 300MHZ Cortex-M7 parts, which are likely to be larger, more costly and more complicated.
So - let’s put the Microchip SAME5x on the short list for now.
Moving over to STMicro - they have a freaking mobile app for selecting an MCU, that’s how many they have. Downloading the STM32 Finder app, I’m faced with a … daunting array of options. 3243 MCUs, actually:
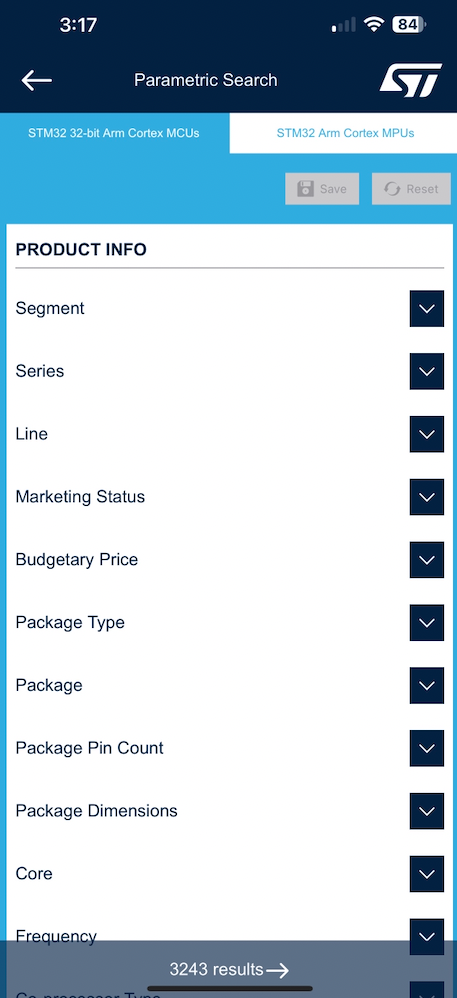
I do an initial walkthrough to narrow this down. There are some no-brainers:
- Marketing Status => ‘Active’ (3243 -> 2991 results)
- Core => ‘ARM Cortex-M4’ (2991 -> 1236 results)
- I2S => ‘From 1 to 5’ (1236 -> 753 results)
- Additional Interfaces -> ‘Ethernet’ (753 -> 155 results)
At 155 results we’re getting there. At this point I load them all and scroll around to see if there are further areas I might want to use to narrow down:
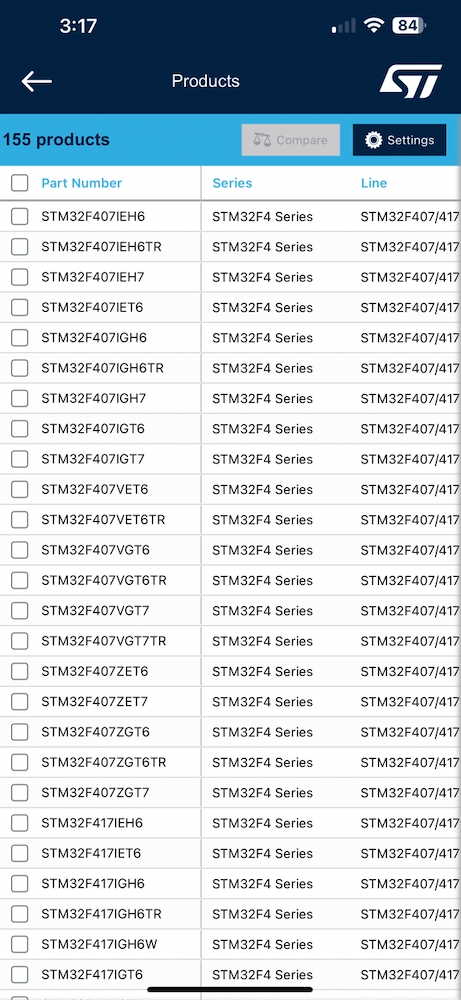
I notice that these are all from the STM32F4 family. This is actually good enough for the short list right now, because the next step is going to be seeing what’s actually able to be ordered in real life, and that might mean I pick a package, flash size, or frequency that wouldn’t normally be my preference.
However - maybe I can narrow it down a bit more, now that I have a breadcrumb. If I go to the specific page for this family, though, I can see that specifically the STM32F407/417 lines have Ethernet. On that family’s specific page, I can see that the differentiator for the 417 over the 407 is that it has some additional crypto hardware - I don’t need that, but if it turns out to be the only one I can buy, then that’s fine.
So now let’s go see what’s in stock.
DigiKey is my favorite resource for this kind of thing.
I first go to Integrated Circuits (ICs) -> Embedded then hit Microcontrollers to get to the parametric search.
First is the basic filters:
- Product Status => ‘Active’
- Stocking Options => ‘In Stock’
- Series => ‘SAM E53’ or ‘STM32F4’
This takes me down to a mere 6 results - now we’re cooking!
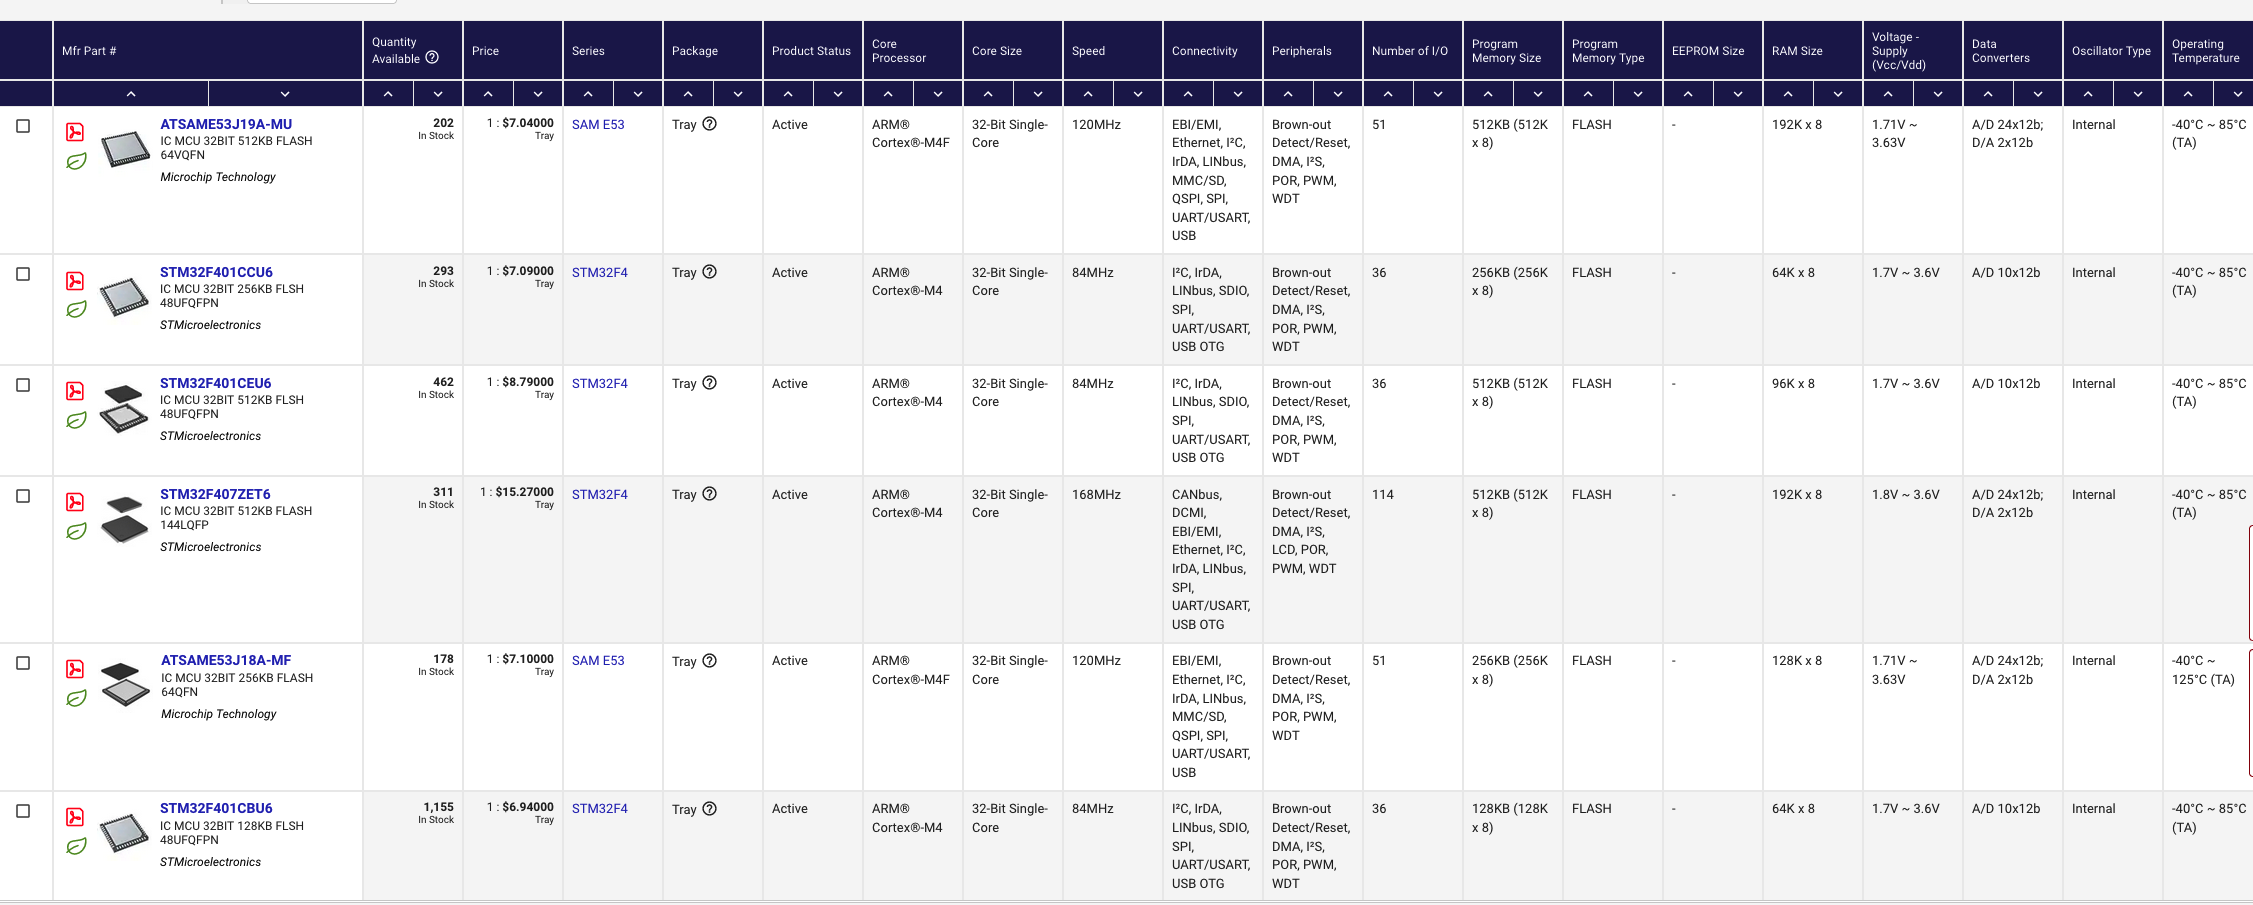
I can rule out the STM32F401 parts - those don’t have Ethernet.
And then there were 3:

I have to say - at this point the Microchip parts are looking preferable, for 2 reasons:
- Under half the price - it’s not like I’m mass-producing these, but money is money.
- The big reason is the package - 144-pin QFP packages are super fiddly to get placed right on a board. It’s a 20x20mm IC with 36 pins on each side - only 0.5mm apart from one another. At 20mm along a side, it doesn’t take many degrees of shaky-handed placement rotation error to have now misaligned a pin or 10. QFP pins also get bent or broken easily. No thanks. The part obviously has easier-to-work-with packages - but this is what the magic ‘In Stock’ filter has left us with. It’s also just a lot more board space and likely more passive components. We just don’t need the I/Os this part has.
So - down to 2, the ATSAME53J19A-MU, or the ATSAM353J18A-MF. The difference, if you look closely in the table (or examine the datasheet and search for “SAME53J19”), is that the J19 has twice as much program memory and 50% more device memory than the J18. As it’s also 6 cents cheaper per part, I say give me the extra breathing room!
At the end of all of this narrowing-down, we have arrived at the Microchip ATSAME53J19A microcontroller for our outdoor microphone use case. As a bonus - I already own an ATMEL-ICE programmer for SAM devices. I’ve only ever used it for 8-bit AVR MCUs (e.g. Arduino Uno) but it ought to work for 32-bit SAM devices as well, per its documentation.
In Part 2, I’ll go into the component selection process for the Ethernet PHY, the MEMS microphone, and the PoE controller. Then in Part 3, I will look at how to best break the overall PCB design process into more manageable chunks.